Many of our
customers have custom product line or products from venders not yet participating
in our ShopKart program. This is why we have made it possible to upload mass
product list. From inside the product
management utility there is a link to the import products tool.
The import
process has 2 steps.
Step1:
Preparing
and uploading your image files
Step2:
Preparing
and uploading the tab delimited file

Very important to Know!
Importing
products into BizWizard ShopKart is not a multiple user function. Only one person may import products at a
time. It is critical no one else is
currently doing a product import before you proceed.
Other user
of BizWizard ShopKart may continue to work within BizWizard ShopKart on other
tasks so long as they do not begin a second product import.
Please Note: Even if another user is working on
different web store, they cannot start another product import
process.
You will be
reminded of this when you initiate a product import and will be given the
opportunity to cancel.
When
Prompted: Do you
wish to proceed with importing products?
v
OKAY: Select if you are certain no other user is
importing product.
v
Cancel:
Select if someone else is importing products or you are uncertain if someone
else might be using the import product utility.

Before you
can upload your images; we need to talk about creating the image files. Be sure the image is at least a minimum of
150 x 150 pixels; maximum of 500 x 500 pixels.
DPI (Dot per inch) should be between 100-200 DPI. Please keep in mind the larger the file the
slower the upload process will be.
Important: the image file names must match
exactly the image file names in your spreadsheet of products used in Step
2.
The image file
name must match exactly the image file name in your spreadsheet of products
used in Step 2.
Here are
some guidelines for image creation.
Remember:
Use one of these image formats *.jpg, *.png, and*.gif; Min size 150 x
150 pixels.
Recommendations: DPI of 100-200; Max size 500 x 500
pixels.
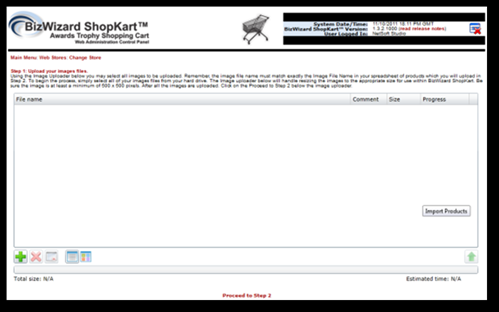
For the
image upload process, the first thing to do is to select all images to be
uploaded.
To
begin the process, simply select all of your images files from your hard drive
by clicking the ![]() icon. The
Image upload Wizard will handle resizing the images to the appropriate size for
use within BizWizard ShopKart. After all
the images are uploaded… Click on the Proceed to Step 2 below the image upload
Wizard.
icon. The
Image upload Wizard will handle resizing the images to the appropriate size for
use within BizWizard ShopKart. After all
the images are uploaded… Click on the Proceed to Step 2 below the image upload
Wizard.
In Step 2,
Download the file “BizWizardShopKartProductImport.xls” This file may be opened
using Microsoft Excel 2003 or later.
The
spreadsheet contains the following required columns of information.
|
v Primary Image File Name v
Supplier
Name v
Product
Family v
Product
Name v
Product
Description v
Lead
Days v
Quantity
In Increments Of v
Minimum
Order Quantity v
Hide
Special Instructions v
Hide
Personalization Text |
v
Taxable
Product v
Volume
Discount Schedule Name v
Retailer
Product Number v
Supplier
Product Number v
Product
Detail Description v
Shipping
Weight v
Additional
Shipping Charge v
Product
Unit Cost v
Product
Unit Price |
Each column
above must contain valid information.
The
spreadsheet also contains the following optional columns of information.
|
v Image Two File Name v
Image
Three File Name v
Image
Four File Name v
PDF
Template File Name v
360
Degree Flash Animation File Name |
v
Category Columns 1 - 10 v
Attribute
Group Name Columns 1 - 10 v
Attribute
Group Display Name Columns 1 - 10 v
Attribute
Group Sort Sequence Columns 1 - 10 v
Attribute
Group Default Value Columns 1 - 10 |
Enter the
supplier name in this column. If the supplier is already in ShopKart, it is
best to copy and paste the suppliers name from ShopKart supplier table (see Supplier Management Interface.) ShopKart will match up the name in this column with
any suppliers with the same name already in the ShopKart supplier table. If
there is no match, then ShopKart will create a supplier in the supplier table
to match up with the name in this column.
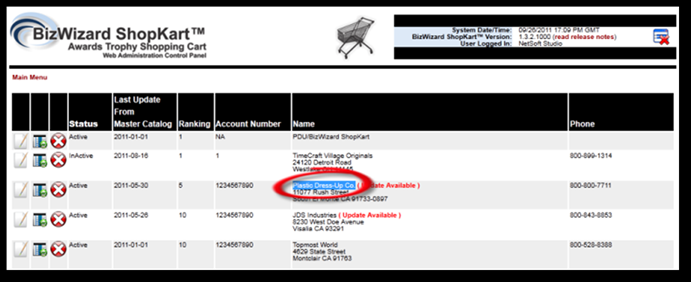
In the example
above we already have Plastic Dress-Up Co. selected as a supplier in ShopKart
so we copy and pasted the supplier name into the Supplier Name Column. Simply
Select the supplier name, right click with your mouse and select the copy
option from the pop-up menu that appears. The maximum length of the supplier
name is 100 characters. Anything longer than 100 characters will be truncated
down to 100 characters.
Now that you
have copied the supplier name, simply paste the supplier name into the Excel
spreadsheet.
Every
product in BizWizard ShopKart has a product family associated with it. Simply
enter the product family name in this column. If there is a product family
already in ShopKart it is best to match up to one that already exists. If you
need to create a new product family for this rows product, then simply put in
the new product family name into this column, and BizWizard ShopKart will
automatically create the new product family. Otherwise it will attempt to match
up the product family name you specify in this column with a product family
that already exists in the product family table. The maximum length of the
product family is 100 characters. Any characters after 100 will be truncated down
to 100 characters.

Simply
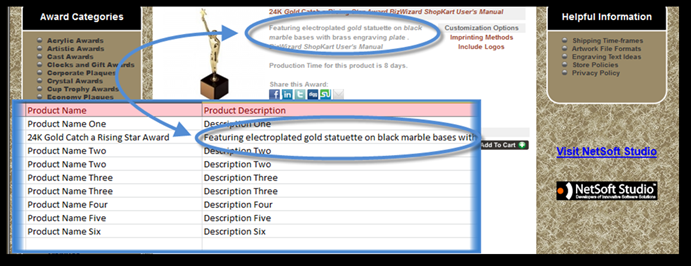
specify the name of the product in this column. The name of the product
translates into the product name and should be an accurate 2-4 word name (or
title if you will) of the product. Use the same types of naming convention you
would use if you were to title a book that you authored. If possible, use SEO
keywords in the title but not to excess, keep the whole title to 2-4 words in
length. The product name may be no longer than 75 characters in length. Any
character longer than 75 characters will be truncated down to 75 characters
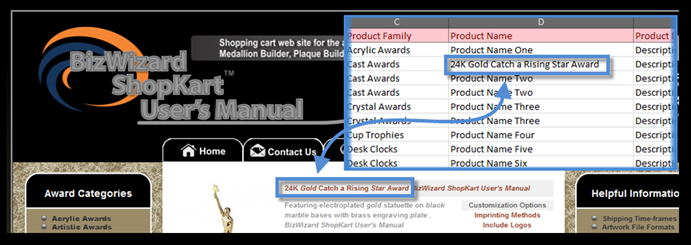
during import. The product name column translates into the name of the product
as show in the below screenshot.
Simply
specify the name of the product in this column. The name of the product
translates into the product name and should be an accurate 2-4 word name (or
title if you will) of the product. Use the same types of naming convention you
would use if you were to title a book that you authored. If possible, use SEO
keywords in the title but not to excess, keep the whole title to 2-4 words in
length. The product name may be no longer than 75 characters in length. Any
character longer than 75 characters will be truncated down to 75 characters
during import.
The product name column translates
into the name of the product as show in the below screenshot.
The lead
day’s column lets ShopKart and your customers know how many days lead time it
will take to produce a product. Simply specify a number from 1 to 180 as the
lead days. Any other number besides the numbers 1-180 will be substituted with
a 5 day lead time. If this column is left blank a ShopKart will also use a 5
day lead time.
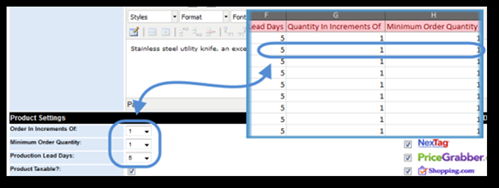
Simply specify the number between the
values of 1 and 500 to indicate what increments products must be ordered in.
For instance if a product is only sold in lots of 5, then put the Quantity in
Increments of at the number 5. Otherwise use the number 1. If you enter any
other quantity other than numbers 1-500, then ShopKart will default the
Quantity in Increments of to 1 when the products are imported.
If the
product in question must meet a minimum order guideline, simply enter the
minimum order quantity in this column. For instance if the customer must
purchase a minimum of 25 medallions, then enter 25 in this column. Otherwise if
there is no minimum order quantity, specify the number 1. Minimum order
quantity must be a number between 1 and 500. Any other number will default back
to a minimum order quantity of 1 during import.
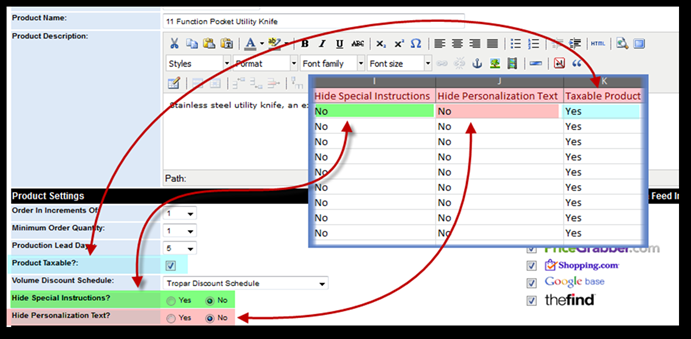
This column
should be either the value of “Yes” or the value of “No” – any other value
placed in this column will be ignored and ShopKart will use the value of “No”
This column hides the special instructions field during the Add to Cart process
when a customer places an order for this product. If you do not want to collect
additional special instructions information, then set this value to “Yes”,
otherwise set it to “No”
This column
should be either the value of “Yes” or the value of “No” – any other value
placed in this column will be ignored and ShopKart will use the value of “No”
This column hides the personalization text field during the Add to Cart process
when a customer places an order for this product if the value is set to “Yes”.
If you do not want to collect personalization text (engraving text), then set
this value to “Yes”, otherwise set it to “No”
This column
should be either the value of “Yes” or the value of “No” and controls whether
ShopKart will calculate sales tax on this item if the item is taxable. Setting
this to a value of “No” means this product is a non-taxable product and
ShopKart should not calculate sales tax on this item when this item is ordered.
Any other value placed in this column besides “Yes” or “No” will cause ShopKart
to ignore the value and set the Taxable Product to “Yes”
Enter into
this column the Volume Discount Schedule name you wish to have associated with
this product. Upon Import, BizWizard ShopKart will match up the name you place
here with the volume discount schedules already created. If a match is found,
ShopKart will use the already created Volume Discount Schedule Name. If the
Volume Discount Schedule does not exist, ShopKart will create a new volume
discount schedule name and automatically add the following volume point breaks:
v
1 → 0%
v
10 → 5%
v
25 → 10%
v
50 → 15%
v
100 → 20%
v
250 → 25%
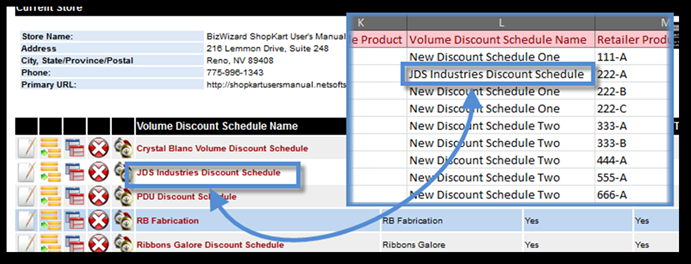
Of course you may always change the volume
discount schedule breakpoints after you have imported. If you want the volume
discount schedules set prior to import, then be sure you create the volume
discount schedule before doing the import and copy and paste the volume
discount schedule name as shown below:
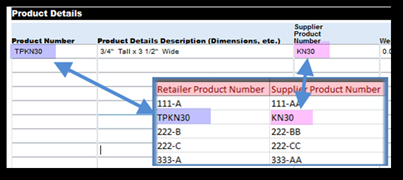
The Retailer Product number is the
product number you sell products under. This typically is the product number
you have printed on your labels attached to products in your showroom. It can
be the same as the supplier product number, or can and usually is different.
Simply enter the Retailer Product number in this column. The retailer product
number must be unique amongst all stores. If a product number is not unique.
ShopKart will append to the end of the retailer product number or pre-pend to
the beginning of the retailer product number enough random characters to ensure
the retailer product number is unique. The Retailer Product number may be no
longer than 30 characters in length and cannot contain any spaces.
The Supplier
Product number is the product number of the product that you must use when
ordering the product from the supplier. This is usually the product number as
printed in the suppliers catalog. Simply enter the Suppliers product number in
this column. The Suppliers product number can be duplicated on multiple
products and does not have to be unique amongst products and stores. The
Supplier product number cannot be longer than 30 characters in length.
The product detail description further distinguishes this product
from the other products. Usually this would relate to a difference in size, or
a difference in color. The Product Detail Description is limited to 100
characters. Any data longer than 100 characters will be truncated to 100
characters in length.
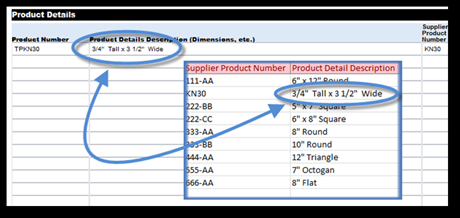
In our example, we have the same plaque, but it is available in
different sizes (7”x9”, 8”x10 ½”, 9”x12”, and 12”x15”) – so we will create the
detail records to distinguish each of these products as shown below:
Here are
some examples of Product Detail Descriptions and how they have been used on
various products:
If you
notice in the spreadsheet the header information (i.e. image name, product
name, product description, supplier name, product type, and volume discount
schedule) are duplicate for each product that is a product detail. This is
important. So if you have 5 products, but all use the same image, same product
name, product description, etc, be sure you duplicate those values for each of the
product details. Not duplicating (or copying them) can give unexpected results
in the import.
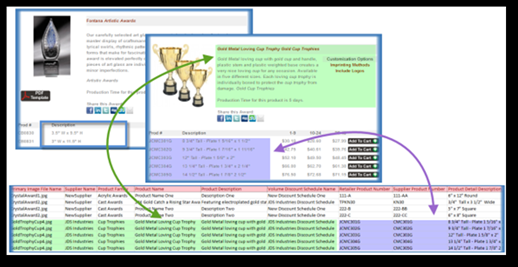
Below is an
example of Product Detail Descriptions and how they have been used on various
products:
If you
notice in the spreadsheet the section marked in green (i.e. image name, product
name, product description, supplier name, etc…) these values are duplicated for
each product detail (mark in purple). This is very important. If you have 5
products, but all use the same image, same product name, product description,
etc… be sure you duplicate the values shown in green for each product details.
Failure to
duplicating (or copying) the values can give unexpected results during the
import process.
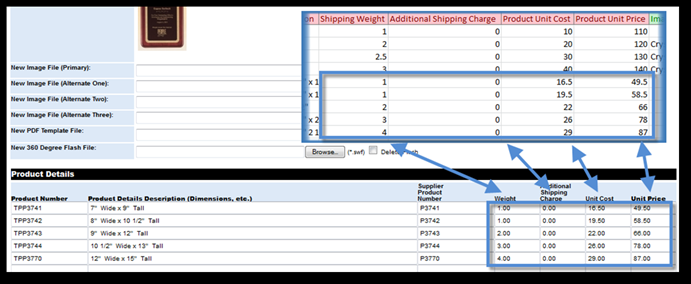
Specify the
shipping weight in this column. Supports up to 1 decimal position. Any numbers
past one decimal position will be rounded to the nearest 1 decimal position
during import. For instance, a shipping weight of 12.37 will be rounded to
12.4.
If this item
has an additional charge per piece that should be charged to cover extra
shipping fees which may be associated with large box sizes, or special box
sizes that cost more for shipping, simply indicate an up charge for shipping
here. Do not enter $ in this field. This field should not contain commas
either. Only enter digits and decimal points.
This is the
cost of the product to buy it from the supplier. If you are a supplier and
providing NetSoft Studio this spreadsheet for your product import this price
should be your Each Unit Price and assumes NO DISCOUNTS or buying programs.
This is the worst case scenario pricing. Do not enter $ in this field. This
field should not contain commas either. Only enter digits and decimal points.
This is the price
to sell to the end consumer. This price assumes no quantity breaks as quantity
breaks will be discounted down from this price when the customer orders a
quantity that gives them a break in pricing. Do not enter $ in this field. This
field should not contain commas either. Only enter digits and decimal points.
In this
section, every column is optional and will only be imported if information is
provided and these columns are identified by green headings. These columns of
data must contain the appropriate information as indicated in the following:
v
Image
Two File Name
v
Image
Three File Name
v
Image
Four File Name
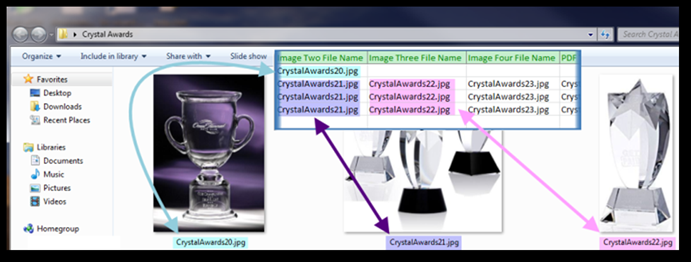
For some
products you may have multiple images. These columns represent any additional
images that will be uploaded into ShopKart and should contain the name of the
image file that will be associated with this product. Typically additional
image file names are for side view, back view or top views of products. These
fields are completely optional and if you do not have additional product
images, simply leave these columns blank. If you do have additional image file
names, simply identify the name of the file exactly as it has or will be
uploaded during product import. The maximum length of image files names is 255
characters. See the following example:
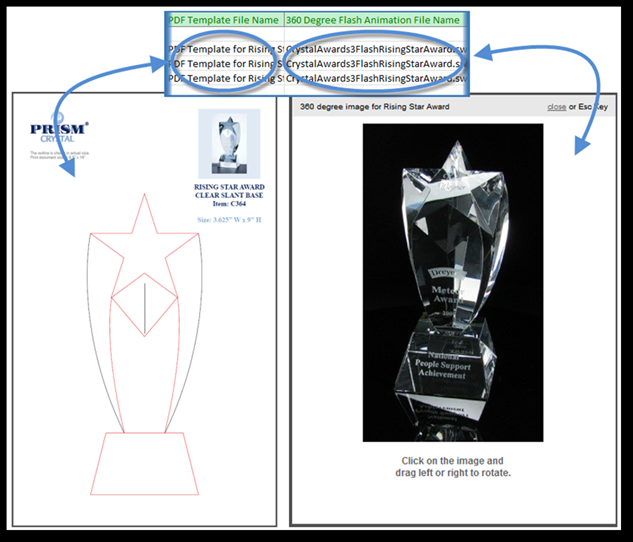
If you will
be uploading a PDF design template with this product, be sure you include the
PDF Template File Name in the column for PDF template and then be sure you
upload the PDF template as part of the image upload. The maximum length of PDF
Template files name is 255 characters. PDF Templates translate into… see image
below:
If you will be uploading a 360 Degree
Flash Animation of this product, be sure you include the 360 Degree Flash
Animation File Name in this column for Flash animation and be sure you upload
the 360 Degree Flash Animation as part of the image upload. The maximum length
of the 360 Degree Flash Animation files name is 255 characters. 360 Degree
Flash Animations translate… see image below:
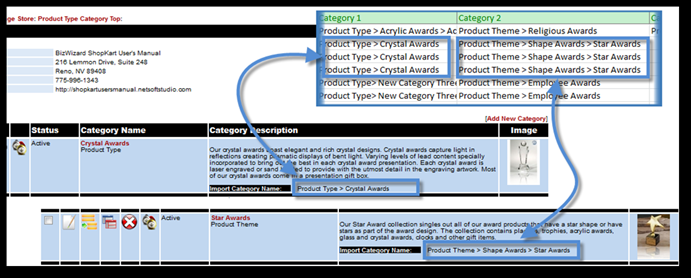
If you would
like BizWizard ShopKart to automatically categorize your products during the
import process, you can use these columns to let BizWizard ShopKart know what
categories to categorize these products into. You can categorize up to 10
categories during import and the categories must already exist prior to doing
the import. ShopKart will not create the categories on the fly if they do not
exist. If the category does not exist, ShopKart simply will not categorize the
product for that category.
To find the
category inside ShopKart, do the following:
1)
From
the Main Menu, click on “Web Stores”
2)
Click
on the Edit Icon next to the store you will import products into
3)
Click
on Product Type Categories or Product Theme Categories
4)
Find
the Category you wish to categorize into and copy and paste the “Import
Category Name” value into the Import Spreadsheet.
See the
below example:
There are
four fields needed for each attribute that is to be initialized for a product
and you may import up to 10 attribute settings. The attribute Group itself must
already exist along with the attribute group options. ShopKart will not create
the attribute group list during product import and if the Attribute group or
option does not exist, ShopKart will ignore the attribute group during import.
You can import your attribute group lists to create them but importing
attribute group lists is discussed in the import document for that function.
The following
are the four fields needed to accomplish attribute imports onto a product:
·
Attribute
Group Name
·
Attribute
Group Display Name
·
Attribute
Group Sort Sequence
·
Attribute
Group Default Value
Each group
must be completely entered into the spreadsheet; however the group itself is
optional. So if you need to add for instance a trophy figure selection list to
a product, you will need to initialize all four columns.

First, find
the attribute group name and copy and paste it to the Attribute Group Name column
in the spreadsheet. The attribute group name can be found on the Attribute
Groups Screen as shown in the following example:
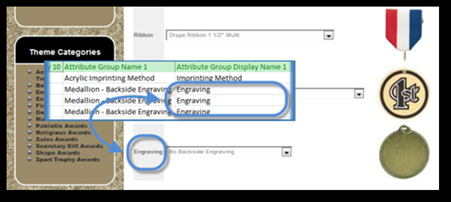
Next put in
the Attribute Group Display Name column the Display name you want to appear as
the name of the pull-down list when a person adds this product to their
shopping cart. For instance, maybe you don’t want the pull-down list to be
titled Medallion – Backside Engraving; maybe you just want it called Backside
Engraving. Simply identify this in the Attribute Group Display Name Column. If
you leave this column blank, ShopKart will automatically set this value to the
Attribute Group Name so be sure you indicate the display name as you want it to
appear:
The
attribute group sort sequence lets ShopKart know which order you wish to have
attribute groups displayed when on the add to cart screen. For instance, in the
above example, the Ribbons Attribute Group is sort sequence 10, and the
Backside engraving is sort sequence 20. 10 sorts before 20 which sorts before
30, etc. If you do not wish to specify an attribute group sequence, ShopKart
will automatically assign a sequence number, however the sequence may not be
what you intended.
In some cases
a sort order may not be important, but when you’re working with trophy builder
or medallion builder products, the sort sequence can be extremely important as
it would look incorrect, for example, show the neck ribbon after the medallion
or the trophy figure below the trophy base.
So just keep
in mind the sort sequence and whether this product requires attributes to
display in a certain pre-defined sort order or not and base your decision on
whether to put a sort sequence in based upon the products requirements for
attribute display order.
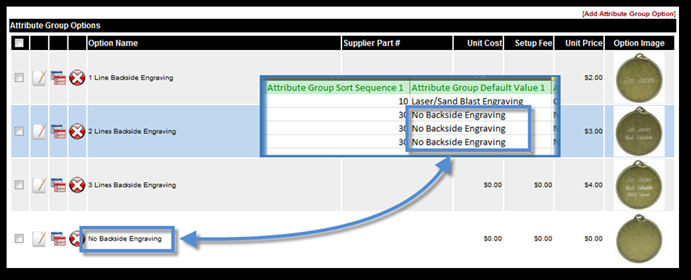
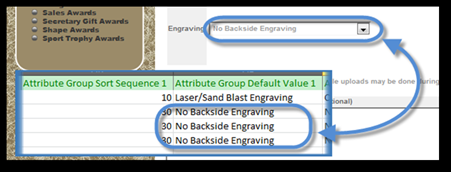
Lastly,
specify the Attribute Group default value. This is the value that will
automatically be selected when a person first add this product to the shopping
cart. For instance, in the following example, the default attribute group is No
Backside Engraving. Simply put, this is the value that is shown first, and the
associated image to that value in the pull-down list will be shown first.
To Obtain
the Attribute Group Display value, use the Attribute Group Option Name from the
attribute group as shown below:
You can repeat
this for up to 10 attribute groups that can be added to a product. Again,
attribute groups are optional and do not have to be provided, but can make
setting up your products much easier in the long run, especially let’s assume
your importing 100 medallions, typically the attribute group is going to be the
same for all 100, so if you set it up for one medallion on one row, then simply
copy and paste those rows down 100 times. It’s much quicker to setup the
attribute group links at import time then to add them to each product one by
one after they are imported.
